

Photo courtesy of High Mowing Seeds.
Today we’ve got a recipe for Kickin’ Collards and Rice, as well as growing, storage and preparation tips for collards and cooking greens from our Vermont Fresh: A Fruit and Vegetable Handbook.
Jonathan Taft-Dick, a volunteer cooking, tasting and testing recipes out of the Vermont Fresh Handbook tested the recipes. His comments are below in italics.
Background
Collard greens are some of the most well-known cooking greens, though in reality there is quite a wide variety. From kale to arugula to mustard greens, not all cooking greens even belong in the same family. The one trait shared by all greens in this category is that they lend themselves to cooking, unlike many salad greens. Collards, a well-known southern comfort food, are most closely related to kale but have smoother, thinner leaves. Being more heat-tolerant than kale, it makes sense that collards are more often associated with warmer climates than some of the other cooking greens.
Growing Tips
Collards can be started indoors or sown outside as soon as the soil can be worked. You can begin picking individual leaves after the plant has been growing steadily for about 6 weeks—pick the lower leaves first and the plant will keep producing. Collards also make a delicious baby green. For a steady supply of baby collards, sow seeds every 4-5 weeks. Collards will grow best with regular watering, though they are more drought-tolerant than many other cooking greens. Like other members of the cabbage family, collards are susceptible to green cabbage worms, but bacillus thuringiensis can be used to control the pests.
Storage
Once picked, collards and other greens can be chilled in cold water, but they should not be stored sopping wet. Shake or spin leaves mostly dry, pack loosely into plastic bags, and refrigerate (in crisper drawer) immediately. Cooking greens will generally only last a few days in the fridge, so use soon. For longer storage, greens can be blanched and frozen. Once frozen, they will store for months and can be thawed in the microwave for easy use.
Nutritional Benefits
With 226 mg of calcium per cup, cooked collards are one of the vegetable world’s biggest contributors to healthy bones. In addition to being so rich in calcium, collards are high in vitamins A, C, B1, and B2. For their low calorie content, collards provide a significant dose of vitamins and minerals. The minerals in collards are more easily absorbed by the body if the greens are cooked, but overcooking will cause the greens to lose some of their vitamins. To retain vitamins, leave the greens slightly crunchy or incorporate cooking liquid.
Preparation
Choose sturdy, unwilted, dark-green leaves without any bruises. Before using, rinse greens under cold running water and spin or blot dry. Most cooking greens can be consumed raw if thinly sliced and added to salads or other dishes, however, as the name suggests, they are most often cooked. Cooked greens are a traditional vegetable side dish. Try steaming, blanching, or lightly sautéing for the best flavor.
Meatless Monday Recipe: Kickin’ Collards and Rice
-
- Photo courtesy of Jonathan Taft-Dick
-
- Photo courtesy of Jonathan Taft-Dick
-

- Photo courtesy of Jonathan Taft-Dick
-
- Photo courtesy of Jonathan Taft-Dick
Serves 6
(adapted from Ken Adams: allrecipes.com)
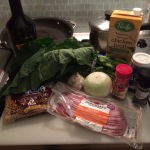
Ingredients
- 2 cups rice
- 1 tablespoon olive oil
- 3 slices thick-cut bacon
- 1 medium onion, chopped
- 2 teaspoons garlic
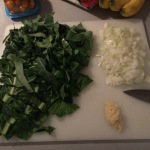
- 1 large bunch fresh collards, chopped
- 3 cups broth (chicken or vegetable)
- 1 teaspoon salt
- 1 teaspoon ground black pepper
- 1 teaspoon red pepper flakes (optional)
Instructions
- Cook rice according to instructions.
- Heat oil in saucepan over medium heat. Cook bacon in saucepan until crisp, then chop it roughly with a spatula.
- Add onion and cook until tender, stirring often.
- Add garlic and collards. Cook until the greens become slightly limp.
- Add chicken broth, salt, and pepper.
- Reduce heat and simmer until greens are very tender, about 20 minutes. Serve greens and broth over rice.
Comments from Jonathan:
Since this recipe called for rice, I immediately got that on the stove while I prepped the other ingredients. I used brown rice which took 40 minutes to cook.
The prep work for this recipe was fairly straight forward. I washed and chopped my collards, chopped the onion, and by the time I was mincing the garlic I put the pan on the stove and started to cook the bacon. The prep work took me just about 15 minutes. The bacon took about 10 minutes to get nice and crispy, and it was fairly easy to chop right in the pan. The onion took about 8-10 minutes to get nice and soft, and then I dumped the collards and garlic in the pan.
The smell of all the ingredients in the pan sauteeing at this point was intoxicating!
The collards wilted down in about 5-10 minutes when I put the chicken stock and seasoning in. At this point my rice was actually done, so I just had to wait the 20 minutes for the collards to cook with the chicken stock.
I actually only cooked 1 cup of rice since I was serving only 3 people including myself, and we had enough leftovers for me to have a dish the next day. So if I had done the full 2 cups of rice there would have been plenty for 6 people. However, one concerning aspect is I liked the ratio of collards to rice with the one cup, and with 2 full cups of rice I feel like the dish would have been too rice heavy.
However, in terms of flavor the dish was phenomenal! I mean anytime bacon is used as an ingredient, how could it not be? I also love spicy food, and I definitely used a lot more red pepper flakes than the recipe called for which gave it a great “kick.”
I was surprised at the length of the cooking time (just over an hour from start to finish) because it didn’t feel like it took that long, but I realized that’s just because it had multiple steps.
From a cost standpoint, I did purchase these ingredients at a regular supermarket. The garlic, onion, parsley and collard greens were $3.00 total. The bacon was $5.95 (I bought Applegate which tends to be a more expensive brand). The brown rice was $1.69 and the chicken stock was $3.99. So the most expensive ingredient was definitely the bacon (I did have plenty left over for other meals), but overall a very inexpensive ingredient list!
I would definitely recommend this recipe, the 2 other people I enjoyed it with were very impressed as well.
To receive more recipes and tips on your favorite fruits and vegetables, download Vermont Fresh: A Fruit and Vegetable Handbook. We also need more volunteer home chefs for this project.
Vermont Foodbank fresh food initiatives would not be possible without your support. Please consider giving to the Vermont Foodbank today!